

How To Fix A Pulled Thread In A Sweater


Are you ready? It's time to knit your very first sweater! Two of the challenges many knitters face when creating their first garment are gauge and fit. Review our tutorial on gauge to ensure your sweater comes out to the dimensions you want, and learn about choosing your size to ensure you get a sweater that fits the way you want it to.

Flax is adorable on wee ones and big ones alike. Make a little size to learn the techniques, or jump off the deep end and get started on a sweater for yourself.
::: Knitting Flax Light? :::
This tutorial includes excerpts from the Flax pattern. If you're following the Flax Light pattern, all the techniques described below will apply, but the numbers will be different.
::: Get Started :::

Download a copy of the Flax pullover pattern or the Flax Light (they're free!) grab your yarn and needles, and let's get down to business. If you have been following along and knitting the other free Simple Collection designs: Wheat Scarf, Malt Blanket, Oats Cowl, Barley Hat, Maize Mitts and Rye Socks, you will already have learned most of the techniques required to make the Flax Pullover. Believe it or not, there aren't that many complex techniques required to make a simple sweater!
::: Construction :::
The Flax sweater is knit from the top down. This means you will cast on at the collar, using either option 1 or option 2. The raglan increases are worked through the yoke and then the sweater is separated into body and sleeves. The body is worked in rounds to the hem and the sleeves are worked in the round to the cuffs. If you have chosen option 2 for the collar you will work the collar ribbing last.
::: Yoke :::
At the cast-on there are two options. Option 1 is the most straightforward, just cast on and work the ribbing. For Option 2 you will cast on and immediately start the yoke, coming back to pick up and work the ribbing at the end. This option is recommended for a little more structure at the neckline, especially useful in larger sizes.
Remember that your sweater has to go over a head, so make sure your cast on is firm but not too tight to stretch over a noggin.
Option 1: Using smaller circular needles cast on 56 (62, 68, 74, 74, 76, 78, 86, 86, 86, 86, 90, 90, 90, 96, 96, 96, 96, 96) sts, place BOR marker and join for working in the round.
Establish 1×1 ribbing: (k1, p1) around
Work in ribbing as established (knit the knits and purl the purls) until piece measures 1 (1.5)" from cast-on for Child (Adult) sizes. Change to larger needles.Option 2 (added structure): Using larger circular needles cast on 56 (62, 68, 74, 74, 76, 78, 86, 86, 86, 86, 90, 90, 90, 96, 96, 96, 96, 96) sts, place BOR marker and join for working in the round. Knit 1 round.
The fist thing you need to decide for your sweater is which cast-on option you will use. The Flax sweater 'hangs' from that cast on point, so picking up and knitting the ribbing later adds a little structure, but it's a little more straightforward to just cast on and start your sweater. Either way is just fine, but if you are knitting a larger size you may want to consider a little extra structure at the neckline.
See this tutorial for details on casting on in the round. BOR is your beginning of round marker. This tells you where your round starts.

Next round: knit, increasing 4 (4, 4, 4, 8, 18, 16, 12, 18, 22, 26, 24, 36, 46, 48, 54, 56, 72, 86) sts evenly spaced
[60 (66, 72, 78, 82, 94, 94, 98, 104, 108, 112, 114, 126, 136, 144, 150, 152, 168, 182) sts]
This may seem like a complicated instruction but follow along and we will do a little math. What this means is that you have 56 (62, 68, 74, 74, 76, 78,86, 86, 86, 86, 90, 90, 90, 96, 96, 96, 96, 96) sts and you need to increase 4 (4, 4, 4, 8, 18, 16, 12, 18, 22, 26, 24, 36, 46, 48, 54, 56, 72, 86) sts for a total of 60 (66, 72, 78, 82, 94, 94, 98, 104, 108, 112, 114, 126, 136, 144, 150, 152, 168, 182) sts. So how are we going to do this?
Take the number of stitches you have and divide them by the number of sts you need to increase:
eg. For the 0-6 mo size: you have 56 sts and you need to increase 4 sts, 56/4 = 14
So I will knit 14 sts, then make 1 stitch 4 times and I will have 60 sts.
It gets a little more complicated when the numbers don't work so perfectly.
eg. for the size XS: you have 86 sts, and you need to increase 12 sts, 86/12 = 7.16. So I will knit 7 sts, then make 1, 12 times, then knit to the end.
Although this may seem unnecessarily complicated (why don't we just do the math for you?!) it's an instruction you will come across often in sweater patterns. If we wrote out each size every time we had to do an increase round like this our patterns would be 10 pages long!
Marker setup: [p10 (11, 12, 13, 13, 14, 14, 15, 15, 15, 15, 15, 16, 16, 17, 17, 17, 19, 21), PM, k20 (22, 24, 26, 28, 33, 33, 34, 37, 39, 41, 42, 47, 52, 55, 58, 59, 65, 70), PM] twice
(these raglan markers indicate the divisions between right sleeve, front, left sleeve, and back sections)

This establishes where the sleeves, front and back are. The sleeves are worked with a garter panel down the middle, while the front and back are worked in stockinette st. [learn more about basic stitch patterns here].
When you are working back and forth, garter stitch is created by knitting every row, but in the round garter stitch is created by knitting on 1 round and purling on the next. Stockinette in the round is created by knitting every round. Since you never turn your work, the right side is always facing you, and therefore the stitches are created differently.

::: Keeping the garter panel in tact :::
The sleeves have a garter panel on them that is maintained throughout the sweater. The garter panel will always be the central 10 (11, 12, 13, 13, 14, 14, 15, 15, 15, 15, 15, 16, 16, 17, 17, 17, 19, 21) sts, no matter what else is happening in the sweater.
Tip: If you are having trouble remembering where the garter panel goes (or you just want things to be a little more fool proof) you may want to place a marker on either side of the panel. Just remember not to work your raglan increases at these extra markers.
::: Raglan increases :::
The Yoke of the sweater is created by increasing (with a kfb) at 8 points on the sweater, 2 sts increased for each sleeve and 2 sts increased on the front and the back. You will be increasing on either side of the 4 raglan markers. One increase comes before the marker and one increase comes after.
Once you have completed the yoke increases it's time to measure. You will be working rounds 'even' (this means without increases, keeping the garter panel on the sleeves as set). If your round gauge matches that stated in the patter, you will need to work 2 (2, 4, 4, 6, 8, 4, 4, 4, 4, 6, 4, 6, 2, 0, 0, 2, 2, 2) rounds even. If not you will work as many rows as necessary for your yoke to measure:
For option 1: 4.5 (5, 5.5, 5.5, 6, 6.5, 6.5, 7.5, 8, 8.5, 9, 9.5, 10.5, 10.5, 11, 11.5, 12, 12, 12)" deep, measured from
cast-on, ending with a round 2.
For option 2: 3.5 (4, 4.5, 4.5, 5, 5.5, 5.5, 6, 6.5, 7, 7.5, 8, 9, 9, 9.5, 10, 10.5, 10.5, 10.5)" deep, measured from cast-on, ending with a round 2.
::: Short Row Shaping :::
If you are feeling adventurous you might want to add short row shaping to your sweater. This will raise the back neck of the sweater relative to the front. It is completely optional so if this is your very first sweater just keep going! Full short row instructions can be found here.
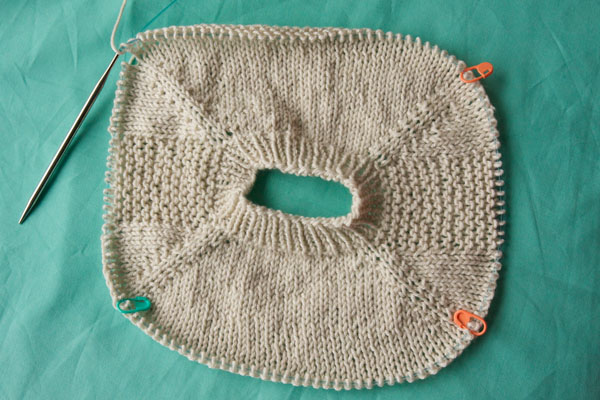
::: Separate Body and Sleeves :::

Now for the fun part: Once you separate the body and sleeves it will start to look like an actual sweater! You will be placing your sleeve sts on waste yarn, casting on sts at the underarm, and joining the front and back. For further instructions on how to place stitches on waste yarn check out our tutorial here.
Next Round: [place 26 (29, 30, 31, 33, 34, 38, 43, 45, 47, 49, 53, 58, 62, 67, 71, 77, 79, 83) sts on waste yarn (the sts from BOR to first raglan marker), using backwards loop method cast on 4 (4, 4, 6, 6, 6, 6, 8, 8, 8, 8, 8, 8, 8, 10, 12, 12, 14, 16) sts, knit to marker] twice
Sleeve sts are on hold and there are 80 (88, 92, 100, 108, 118, 126, 140, 150, 158, 166, 176, 194, 212, 230, 248, 262, 278, 296) body sts on the needles.
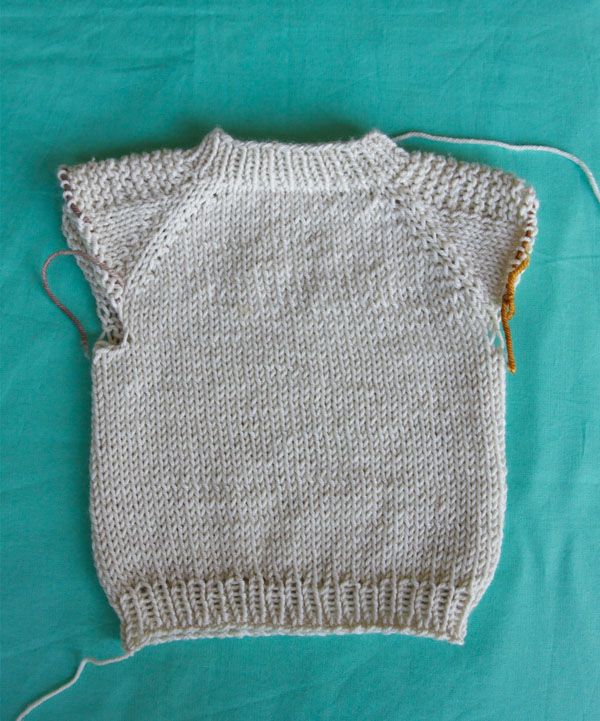
sleeve sts on waste yarn
Now you will have just the body sts on your needles with 2 sleeves on waste yarn. Starting to look like a sweater yet?

::: Body :::
Here comes the easy peasy miles of stockinette! Just knit knit knit until your piece is:
For regular length: 5 (5.5, 6, 7, 9, 12, 14, 13.5, 13.5, 14.5, 14.5, 15.5, 16.5, 17, 17.5, 18.5, 18.5, 18.5, 18.5)"
from underarm (or 1 (1.5)" short of desired length for Child (Adult) sizes).
For cropped length: 3 (3, 4, 5, 6, 7, 8, 8.5, 9.5, 9.5, 9.5, 10.5, 11.5, 11.5, 12.5, 12.5, 12.5, 12.5, 12.5)" from underarm (or 1 (1.5)" short of desired length for Child (Adult) sizes).
All options: Change to smaller needles and work in 1×1 ribbing for 1 (1.5)" for Child (Adult) sizes. Bind off all sts loosely.

Binding off: You can choose either a regular bind off or a bind off in pattern. For a regular bind off you are working 2 knit sts, passing the first over the second, knitting another stitch, passing the first over the second etc [tutorial here]. Binding off in pattern is almost the same, but instead of knitting each of the sts you are working them in pattern.
For this sweater it will be: k1, p1, pass st over, k1, pass st over, p1, pass st over, etc.
::: Sleeves :::
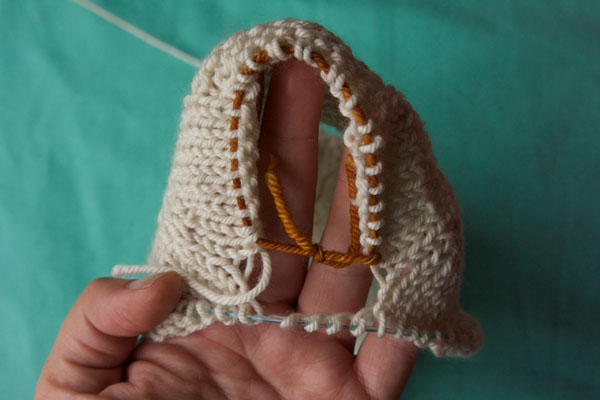
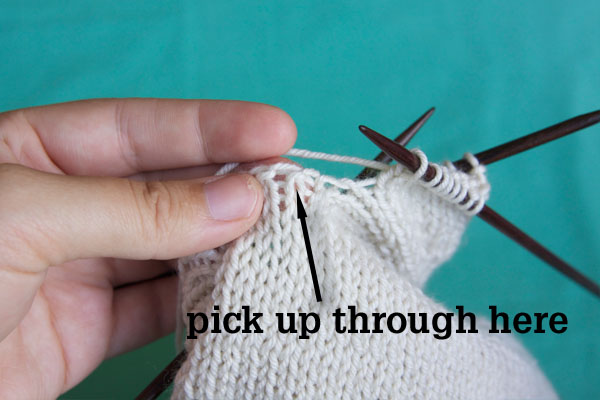
Place 26 (29, 30, 31, 33, 34, 38, 43, 45, 47, 49, 53, 58, 62, 67, 71, 77, 79, 83) held sts onto larger DPNs or 16" circular needle for larger sizes. Knit across these sts then pick up and knit 2 (2, 2, 3, 3, 3, 3, 4, 4, 4, 4, 4, 4, 4,
5, 6, 6, 7, 8) sts from body at underarm, PM to indicate BOR, pick up and knit 2 (2, 2, 3, 3, 3, 3, 4, 4, 4, 4, 4, 4, 4, 5, 6, 6, 7, 8) more sts from body at underarm, then join for working in the round.Note: You can also use a long circular to knit your sleeves using the magic loop technique.

Put your needle through the live sts before removing the waste yarn.
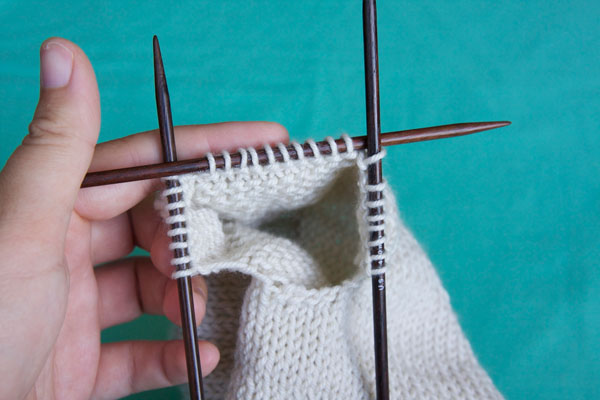
All sts are on DPNs
picking up underarms sts.
If you are doing one of the larger sizes, it's easiest to start with a 16″ circular needle and switch to DPN's when you have worked a few decrease rounds.
For the smaller sizes you will be picking up your stitches on DPN's and the easiest way to distribute them is putting the sts from the BOR to the garter panel on N1, the garter panel on N2, and the rest of the sts on N3. The beginning of your round is the first st on N1 (the middle of the underarm).
Once you have picked up all of your sts, you will join again for working in the round. You might have a small hole at the underarm, not to worry, we will stitch that up later.

Work 3 (4, 5, 6, 8, 9, 11, 8, 8, 8, 8, 7, 6, 6, 4, 5, 4, 5, 3)" even, maintaining garter panel and knitting all other stitches.
If you want to adjust the sleeve length, this is a good place to do it. If you want a longer or short sleeve, here is where you should add or subtract inches.
Decrease round: k1, k2tog, knit to 3 sts before marker, ssk, k1
Repeat the previous 6 (6, 6, 6, 6, 6, 6, 6, 6, 6, 6, 6, 6, 6, 6, 5, 5, 4, 4) rounds 1 (1, 1, 1, 1, 1, 2, 5, 5, 6, 6, 7, 9, 10, 12, 14, 16, 18, 21) more times.
Work 5 (5, 5, 5, 5, 5, 5, 5, 5, 5, 5, 5, 5, 5, 5, 4, 4, 3, 3) rounds even.
[26 (29, 30, 33, 35, 36, 38, 39, 41, 41, 43, 45, 46, 48, 51, 53, 55, 55, 55) sts]
Continue working sleeve as instructed, you already have all the skills required!
Tip: Making 2 the same
The important thing about knitting sleeves is making 2 the same (sounds obvious right?). So make sure to take notes on the number of rounds you work as you go.
- how many rounds to the first decrease?
- how many rounds after the last decrease but before the ribbing?
- how many rounds in the ribbing?

::: Finishing :::
If you worked option 2 at the cast-on work ribbing as follows:
With smaller needles and RS facing, pick up and knit 1 stitch in each cast-on stitch.
[56 (62, 68, 74, 74, 76, 78, 86, 86, 86, 86, 90, 90, 90, 96, 96, 96, 96, 96) sts].
Work in 1×1 ribbing for 1 (1.5)" for Child (Adult) sizes. Bind off all sts loosely.
Finishing a sweater can be the most important part. Block your sweater and weave in your ends. There will be a small hole at the underarm, use your tail to sew that up.
You have put a lot of work into your first sweater so don't skip blocking, it's an important step. Your yarn has been running through your fingers and probably needs a wash at minimum. Blocking will make your stitches even out and lie flat and generally 'smooth out' your work. It's easy to block a sweater out of proportion if you aren't careful. Make sure you have your measuring tape handy and that your chest measurements and length are as desired.

This tutorial is part of The Simple Collection – our 100% free learn-to-knit series. Check out the fabulous free patterns sized from baby to big, and get started making modern seamless knits for the entire family! Like our work? Get our email updates and we will let you know about new patterns, tutorials, and events.
Save
Save
How To Fix A Pulled Thread In A Sweater
Source: https://blog.tincanknits.com/2013/10/25/lets-knit-a-sweater/
Posted by: leesherfeelf.blogspot.com
0 Response to "How To Fix A Pulled Thread In A Sweater"
Post a Comment